Total Road Solutions - LOW VOLUME ROADS

In this section, we will guide you through the
"Total Road Solutions" of Low Volume Roads,
from identifying your road problems to
"the "FAHR ROADCRUSHER's method" of road repair.


IDENTIFYING YOUR ROAD PROBLEM(S):

It is very difficult to identify a "common road problem" when defining your unique road challenges and it is not realistic to say that all roads are alike. Various factors determine the current condition of any road surface ranging from how you road was originally built, what materials were used, your weather conditions and the various levels of maintenance used to maintain them over the years.

Without going into too much detail, here are a few examples of what usually happens to low volume roads, (specifically gravel roads) and what causes them to deteriorate.


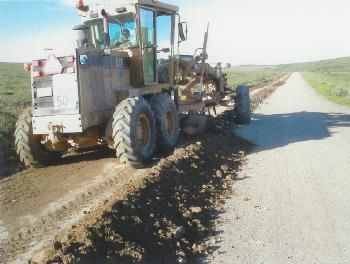
Picture 1: Over Grading

Here is a great example of a road that has deteriorated due to wind and traffic causing the finer material to blow off. Notice that in an attempt to recover more fine material from the surface, a grader has ripped and worked the larger rocks from the road and pushed it into a pile along the road edge.  This pile of rock will restrict future water drainage from the road bed and increase erosion. (looks ready to crush)


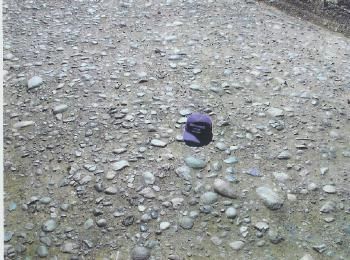
Picture 2:  Poor Construction

Years ago, some roads were built with whatever material was available. Here is a logging road that was constructed using river rock from a local stream. As in picture 1 above, this material will either need to be covered over by importing new material or even better, crushed.


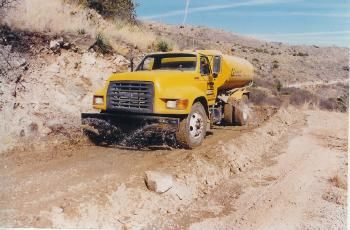
Picture 3: Large Exposed Rocks

As in picture 1, this road has had its finer material washed, blown and pushed off the road surface. Again, notice the large pile of material that has been pushed to the road edge (why not recycle it?).
 
The "after" shot of this photo is  picture # 20 below


Picture 4: Dry, windy conditions

This road located in southern Arizona near the Mexican boarder is in a very dry and windy area. Although there is very little traffic on this road the elements have stripped the finer material from the surface and left the road very hard to ride on.


PREPARING THE ROAD SURFACE BEFORE CRUSHING:

Many methods of preparing the road surface can be used depending on what's in your road. Loose gravel piles along the side of the road edge and material in the ditches can usually be recovered by using a grader.

River rock, large angular rocks and all other types of material (excluding bedrock) can usually be recovered using either a grader equipped with a ripper or a dozer can be used.

Bedrock or any other type of fixed rock (anything too large to remove from the road bed) can usually be reduced or lowered using a hydraulic hammer. It is not important to remove all bedrock, only remove material down to 6 inches below where your finished road level will be. You will later overlay the surface with 4 - 6 inches of crushed material.

Other road "in-place processing" type machines can be used to remove bedrock but are costly and they are not necessary if you only have occasional spots of bedrock. The FAHR ROADCRUSHER method of crushing allows you to clean out your ditches and return your road to its original width and height as it crushes on the surface. "In-place processing" machines dig into the entire road surface and loosens all material (including the existing stable base) which may be the cause of future water erosion. The FAHR ROADCRUSHERs' patented crushing system can provide a better crushed end product, so don't sacrifice the integrity of your entire road bed just to remove a bit of bedrock.


Picture 5: Dozer

This D6 Dozer is being used to loosen the top 4-6 inches of rock material on the surface. This machine is a good way to regulate your cutting depth as not to pull up any culverts or dig too deep into the existing stable base.


Picture 6:
Ready to be windrowed

Now that the road surface has been ripped, the grader can come in and windrow the material into a pile about 16 inches high by 5.5 feet wide. Water can then be added to keep down the dust during crushing and provide good moisture content.


Picture 7: Pulling the ditches

In some cases, material that had been bladed into the ditches can be recovered and formed into a windrow on one side of the road. This method will raise the road height and create better water run-off, drainage and ditch flow.


Picture 8: Windrow prep.

This D6 Dozer is assisting the grader operator by pushing the ripped material into a pile along the road.


PREPARING A WINDROW


Picture 9: Grading

Grading a windrow of material is simple but is one of the most important steps to the crushers success. A properly formed windrow will allow the crusher (loader) operator to work at its maximum efficiency.


Picture 10: The correct mixture

If the windrow is too large (larger than 16" H X 5.5' W) the grader operator can simply work the material from side to side to remove excess fine material.

The whole concept of the FAHR ROADCRUSHER method of crushing is to crush the problem material so the more rock in your windrow, the better you are (to a point). An idea mixture percentage is 60-80 % rock with the remainder being finer material.

More than one windrow can be made if your road surface is wider than 12 feet or if you plan to process a larger amount of material that can fit in one windrow.


Picture 11: Windrow position


Windrow positioning is another part of the crushers' success. As you can see in this photo, the grader operator has made an even and consistent windrow and has worked out much of the finer material. This ensures that the crusher processes the maximum amount of material in one pass.


Picture 12:  Water

Water is usually needed before the grader starts working to keep dust down. A second application of water can be added to the windrow just before crushing.  A third is needed just before the grader operator mixes the crushed material, this ensures that the optimal water content is within the finished road surface during compaction. Depending on your area weather, water may not be needed.


Picture 13: Ready?     

Just before crushing it is wise to check your windrow for foreign objects such as steel, plastic, large branches or anything that may cause trouble for the crusher. Smaller objects like plastic bottles or small tree branches will not effect the crusher but it's just a good idea to remove anything you don't want in your finished roadbed.


CRUSHING


Picture 14: Bring in the crusher!

This is the easy part of the whole process. Simply align the crusher over the windrow, lower the skids flat on the road surface and slowly drive the crusher forward over the windrow.

The crushers' patented crushing system takes all the material in the windrow and drives it upward where it is crushed against a stationary anvil.

From this point on, all the crusher operator has to do is watch he gages and keep an eye on the road level.


Picture 15: Keep on Crushing!

The crusher will take all material as large as 16 inches and crush it down to 2 inch minus aggregate*, in a single pass.

Picture #18b, below, was taken at the exact same location only after it had been crushed.


Picture 16:  Let's get closer

In this photo you can see the crushed material.

The crusher discharge flap is on the left and the loader tires are at the right.


Picture 17:

Crushed Material

In this photo, you can see that the FAHR ROADCRUSHER has completely recycled the larger rocks that were in the original windrow.

The finished material is now an average 2 inch minus* with a good mixture of medium to fine material. This mixture of large to finer aggregate along with the proper moisture content will ensure that the finished road surface compacts well and becomes a stable interlocking structure.


Picture 18a:
Uncrushed Rock

(before)  

This is the same picture as shown before (picture #15), we just wanted to show you the before and after photos.


Picture 18b :
Crushed Rock

(after)

This photo and the last photo (18a) were taken from the same exact location and only about 5 minutes apart.

Photo taken during USDA project in Arizona


FINISHING THE ROAD SURFACE


Picture 19: Finish Grading

It is important to always grade the crushed material as soon as possible in an effort to maintain the proper moisture in the crushed material. This helps the crushed material compact better and provides a more stable driving surface.


Picture 20: A new surface

The before photo is picture #3. Notice how the road no longer has large rocks sticking out of the surface and how the pile of rocks along the road edge are gone. It's not wasted, it's back in the roadbed - where it belongs.


 Conclusion:

If you have roads that look like the roads on page one of this section, there is now a solution. A solution that can save you time, money, and having to create new gravel pits. A solution where some of our clients are saving 50% and even 90% over some traditional methods of road maintenance expenses.


Contact
  FAHR Industries and request a free DVD video of the FAHR ROADCRUSHER in operation, and let us help you solve your road maintenance problems.

Or Call: 1-888-983-7333 (USA), (808) 330-FAHR (3247) (Int'l)